Welcome to the first of many "new" old school reviews
by SCP. This format will be a bit different than the standard you are used
too. Not only will we discuss the pro and cons, but also some technical
information, possible modifications and DIY improvements. This is a
cooperative effort, and I hope many more people will be involved as time
goes on. -Maverick
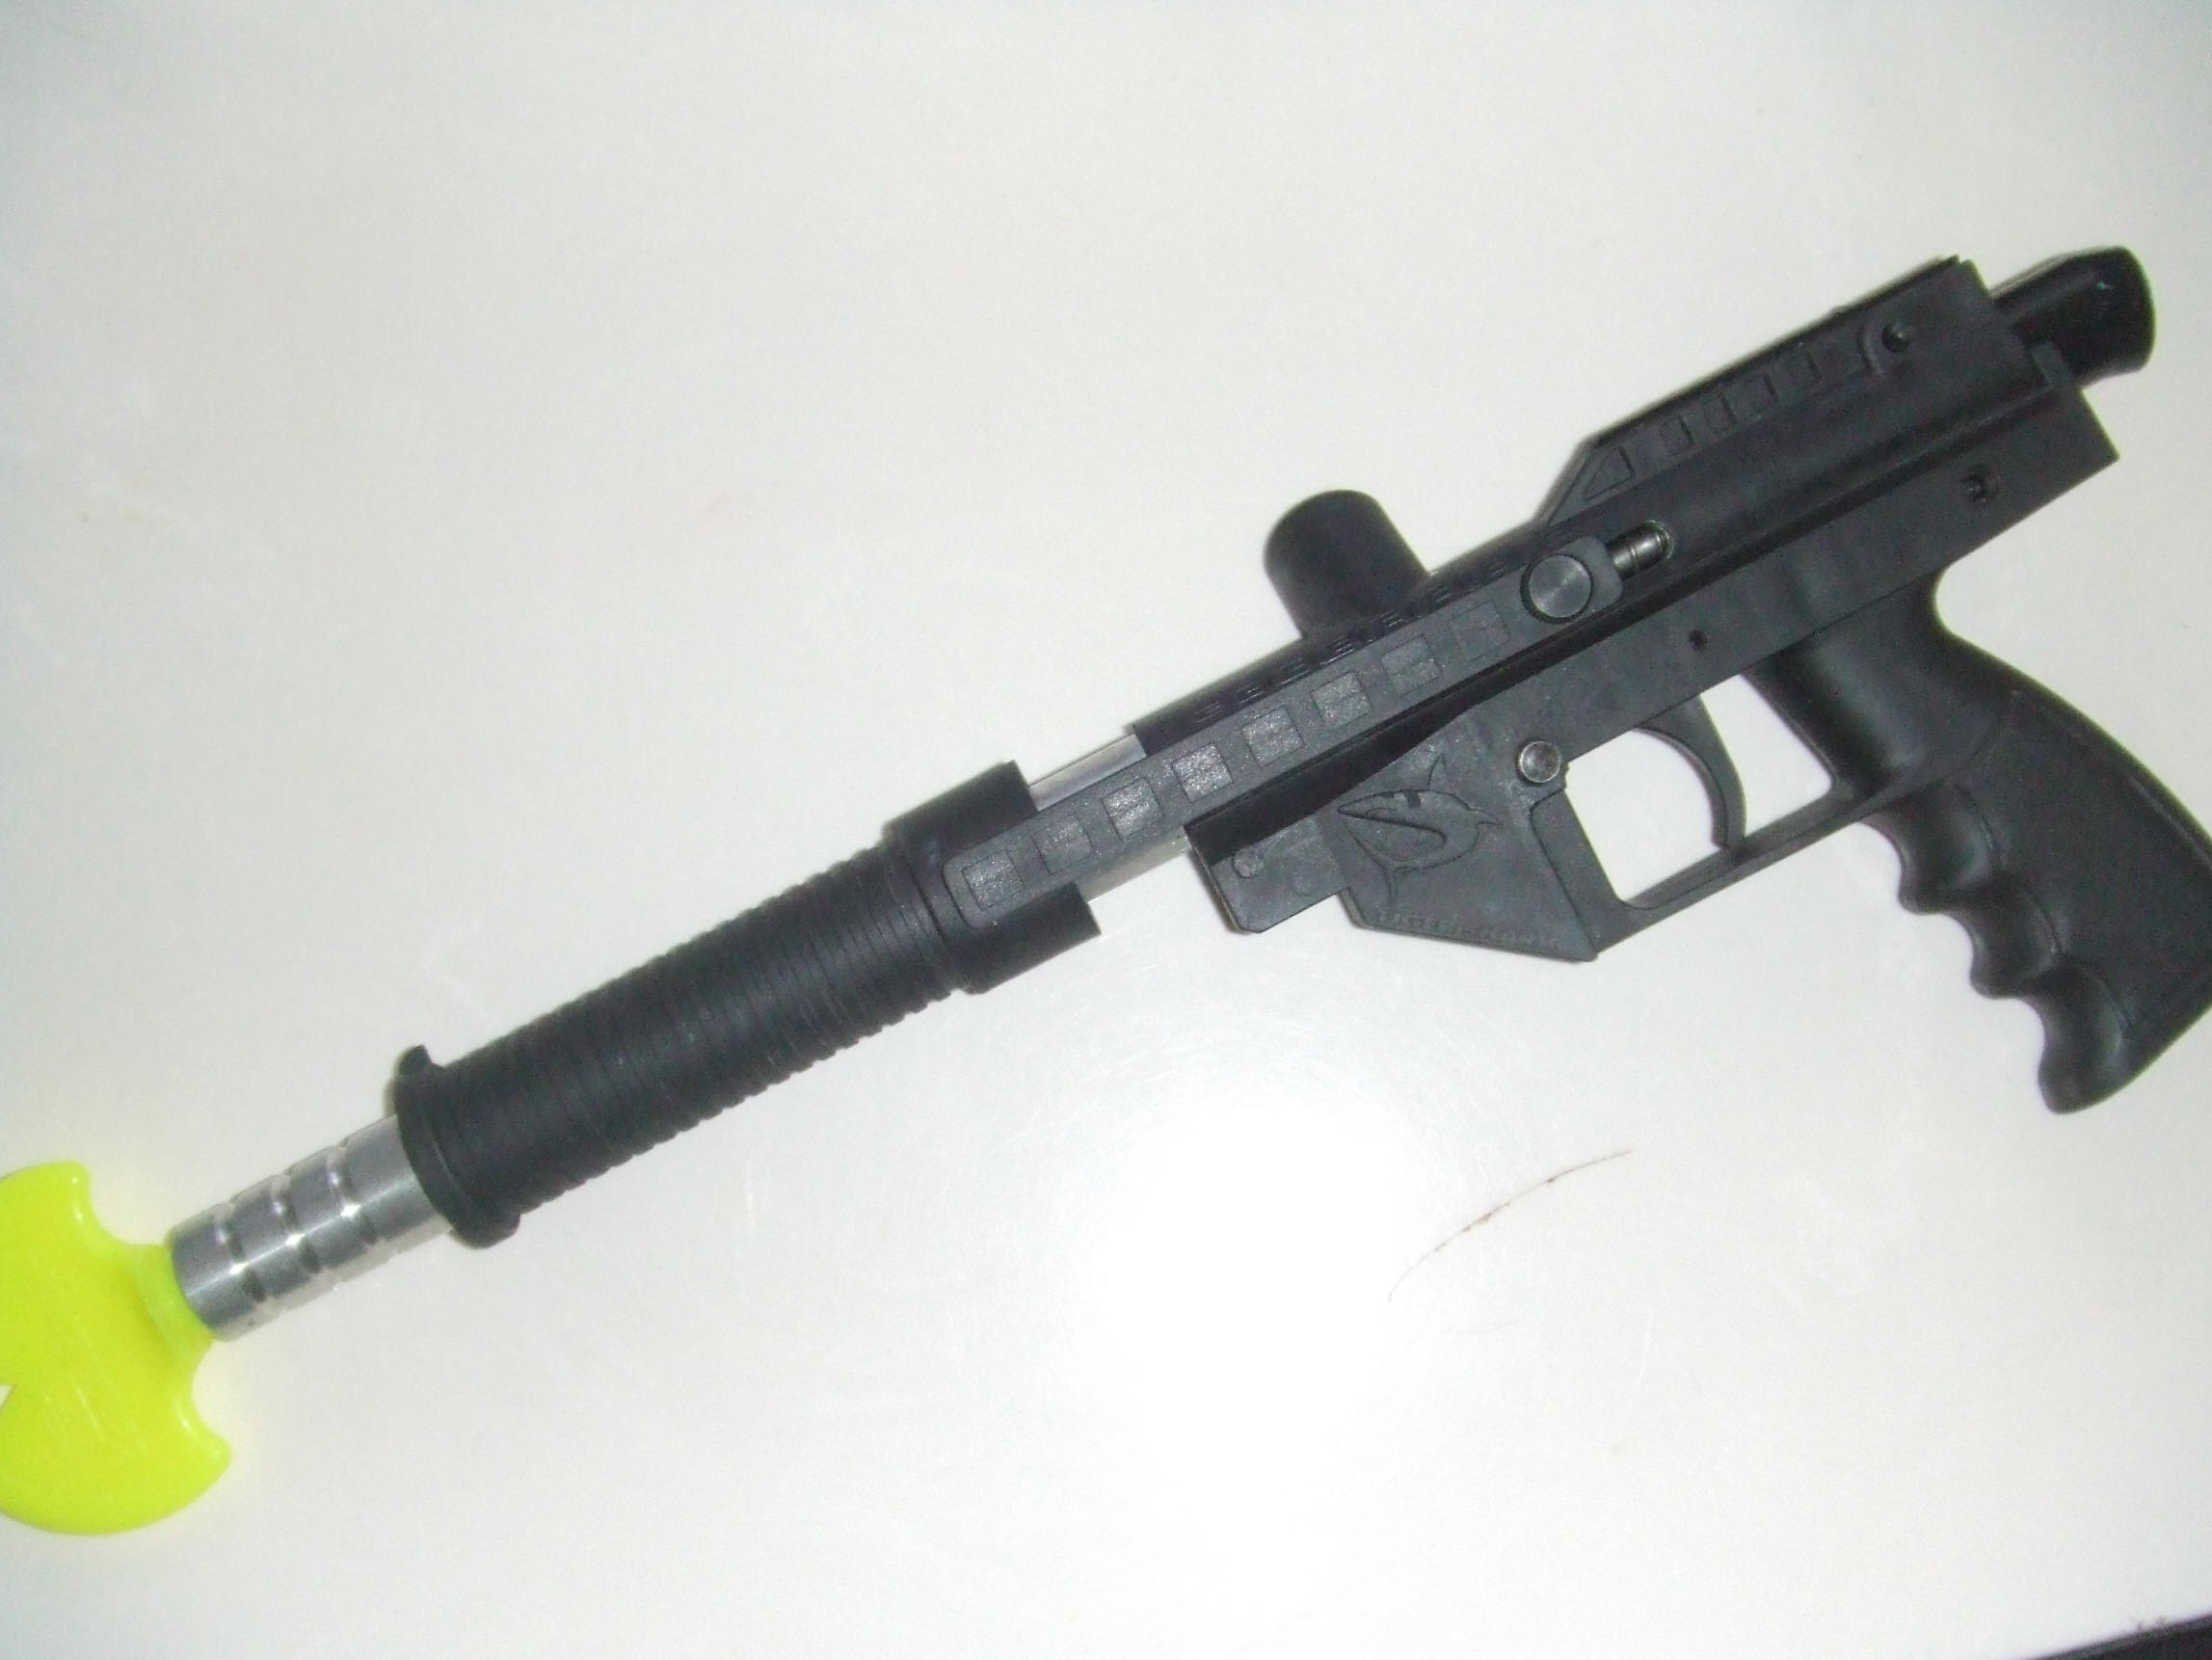
The Brass Eagle Tiger Shark
(tm) Is an Icon in Pump Paintball History! It rarely gets any credit,
and is often the butt of jokes, but the truth of the matter is that this
pump gun sold in tremendous quantities throughout the USA and Canada, for a
very long time, and its tough as nails! We are going to take a new look at
this classic pump, and maybe learn a few things along the way.
The Tiger Shark was released In the late 90's by Brass Eagle Rogers
(Arkansas, USA) and manufactured in Canada. It was a Bit late to the scene,
okay, very late to the pump scene, over a decade, however it was cheap and
built on the same basic platform as the Stingray semi auto. It features a
Nelson based design, proprietary threaded barrel, and is constructed of a
plastic polymer that is very durable, similar to the old NSG Splatmaster.
It shares is basic grip frame design the Stingray, with only minor
differences in the mold and trigger assembly. Being a basic and budget
friendly marker, there is no external velocity adjustment, and very few
options. It was marketed through out the USA and Canada, and widely
available at sporting good stores and big box discounters. It was a worthy
paintball gun, and well get to the part that makes it worthy shortly, first,
lets take a look at the guts of a Tiger Shark!
Breaking down a Shark:
Stripping a Shark is rather straight forward. As with all marker
work, please de gas the marker and remove the air source prior to begining.
Failure to do this could result in serious injury or death. The marker body
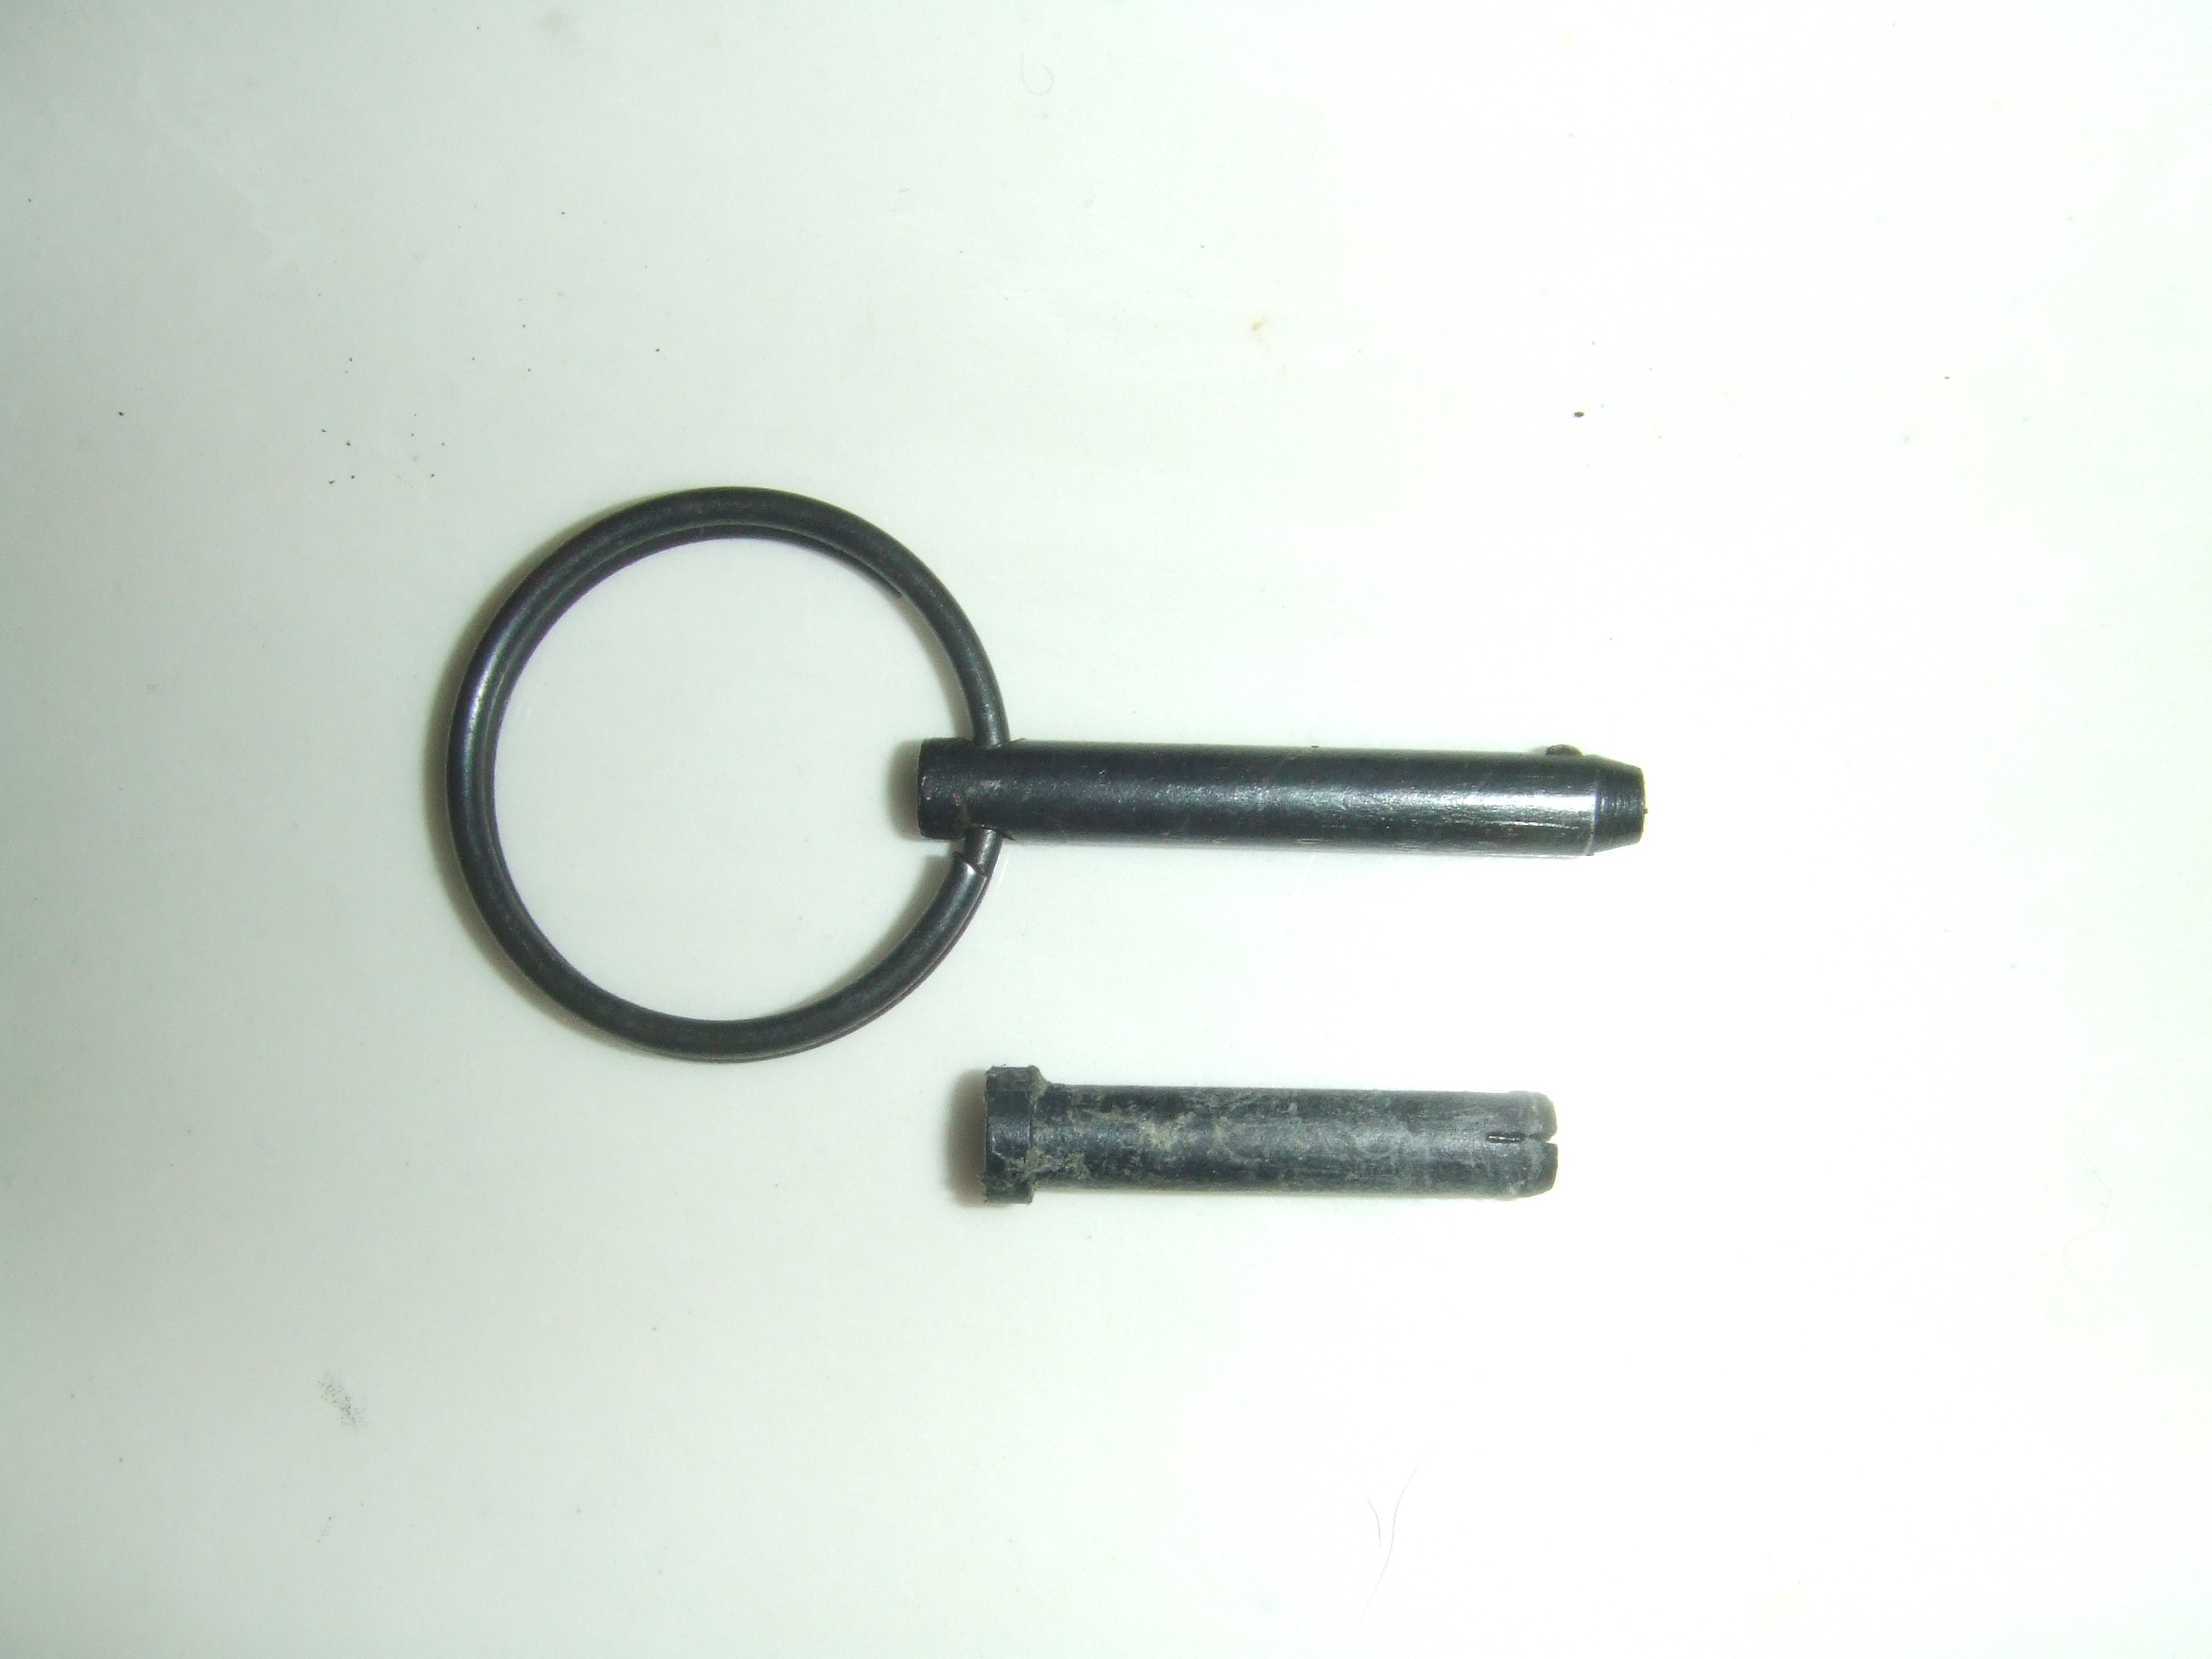
is secured to the grip frame assembly with two simple push
pins. removing the rear lower pin allows the body to tip up and away from
the frame. This is a great feature for easy field stripping, especially if
you replace the factory push pins with Pull pins, as seen in fig. 2. The
plastic factory pins simply push out from the narrow side, use a small punch
or even an Allen key, they don't require much force to remove. Once you have
the rear of the marker up and away from the rest of the grip frame
(picture), complete field stripping is accomplished by simply removing the
upper rear pin, and pulling the rear Air source adaptor, or A.S.A out of the
back of the paintball gun. Since the ASA has two tabs which slip into the
marker body it would be difficult to get the orientation wrong upon
reassembly, but take a good look fist, or even a digital picture,
just in case. Figure three shows the full set of internals after they have
been removed. You will also need to unscrew the knurled bolts from the pumps
arms and remove the pump.
As you will notice, there is absolutely nothing exotic about this punp.
It is similar to all nelson based pumps, but there are some differences.
First, it has a huge power tube! You will also find the fit and finish is
fairly rough, and well talk about that some more later. As you can see,
nothing scary about Tiger Sharks once you dissect them, and all very easy to
do.
Adjusting
Velocity: You've got to go old school if you want to adjust velocity on a
Shark. No adjustable bolt, no adjustable hammer, so that leaves you with
shims and springs. Stock with new original springs Sharks should shoot in
the 215-260 range depending on air source, and temperature (if using co2.)
Which is okay, but not great, however it is enough to get a paintball to
break on target in moderate weather.
I did note a few things while inspecting the
setup:
The Valve nut is very thick, as is the valve tube. but there are
problems inherent with the shark that instantly reduces airflow. the
first issue I found is that the tube itself is not drilled to tight
tolerances, in fact, I dont think it was drilled at all, as the aluminum
appears to have been wrapped, not drilled from straight stock. nothing
to be done about that except polish it to a mirror finish.
The second issue I confirmed, and I must give credit to
Scarecrow
for this one, which I found while researching online, is the valve tube
gas port is severely restricted by the valve nut. Scarecrow has
the most reasonable fix for
this, but it may also create other issues so take heed before getting
out your drill. He found a cure by simply drilling the tube nut a small
bit, which allows the shoulder on the valve tube to sit deeper into the
securing nut. This has the result of exposing more of the gas port
inside the valve, thus allowing more air or co2 though to the bolt.
A disadvantage of this is that you will also have to add a washer or spacer
to the back of the hammer as well to ensure it proper operation. Plan on
adjusting or changing springs after performing this modification, as it
may suddenly shoot "hot." I have not yet done this so I cant say from
experience if this alone
is enough to increase the stock set up velocity to over 280 FPS, but
it's certainly something to keep in mind.
Another note on the valve nut, it has fine threads. Most nelson
based markers have wider thread spacing from what I've seen. I'm not an
air smith , but I did compare the valve nut threads to some nelson valve nuts I had in my box, the threads are different than the standard valve nuts.
As with most Paintball guns, all internals, as well as the barrel on
the Shark could benefit from a good polishing. I generally use "0000"
steel wool for this. It is not a fast process, but the light weight
steel wool makes it nearly impossible to cut grooves or mess things up.
Power tools and polishing pads are less labor intensive, but also
increase the risk factor for mistakes. Steel wool is about $4 for a
large bag at any hardware store, and that bag will last a very long
time. besides, it's a good workout! Dont forget ,"0000" rougher grades
may result in scratches.
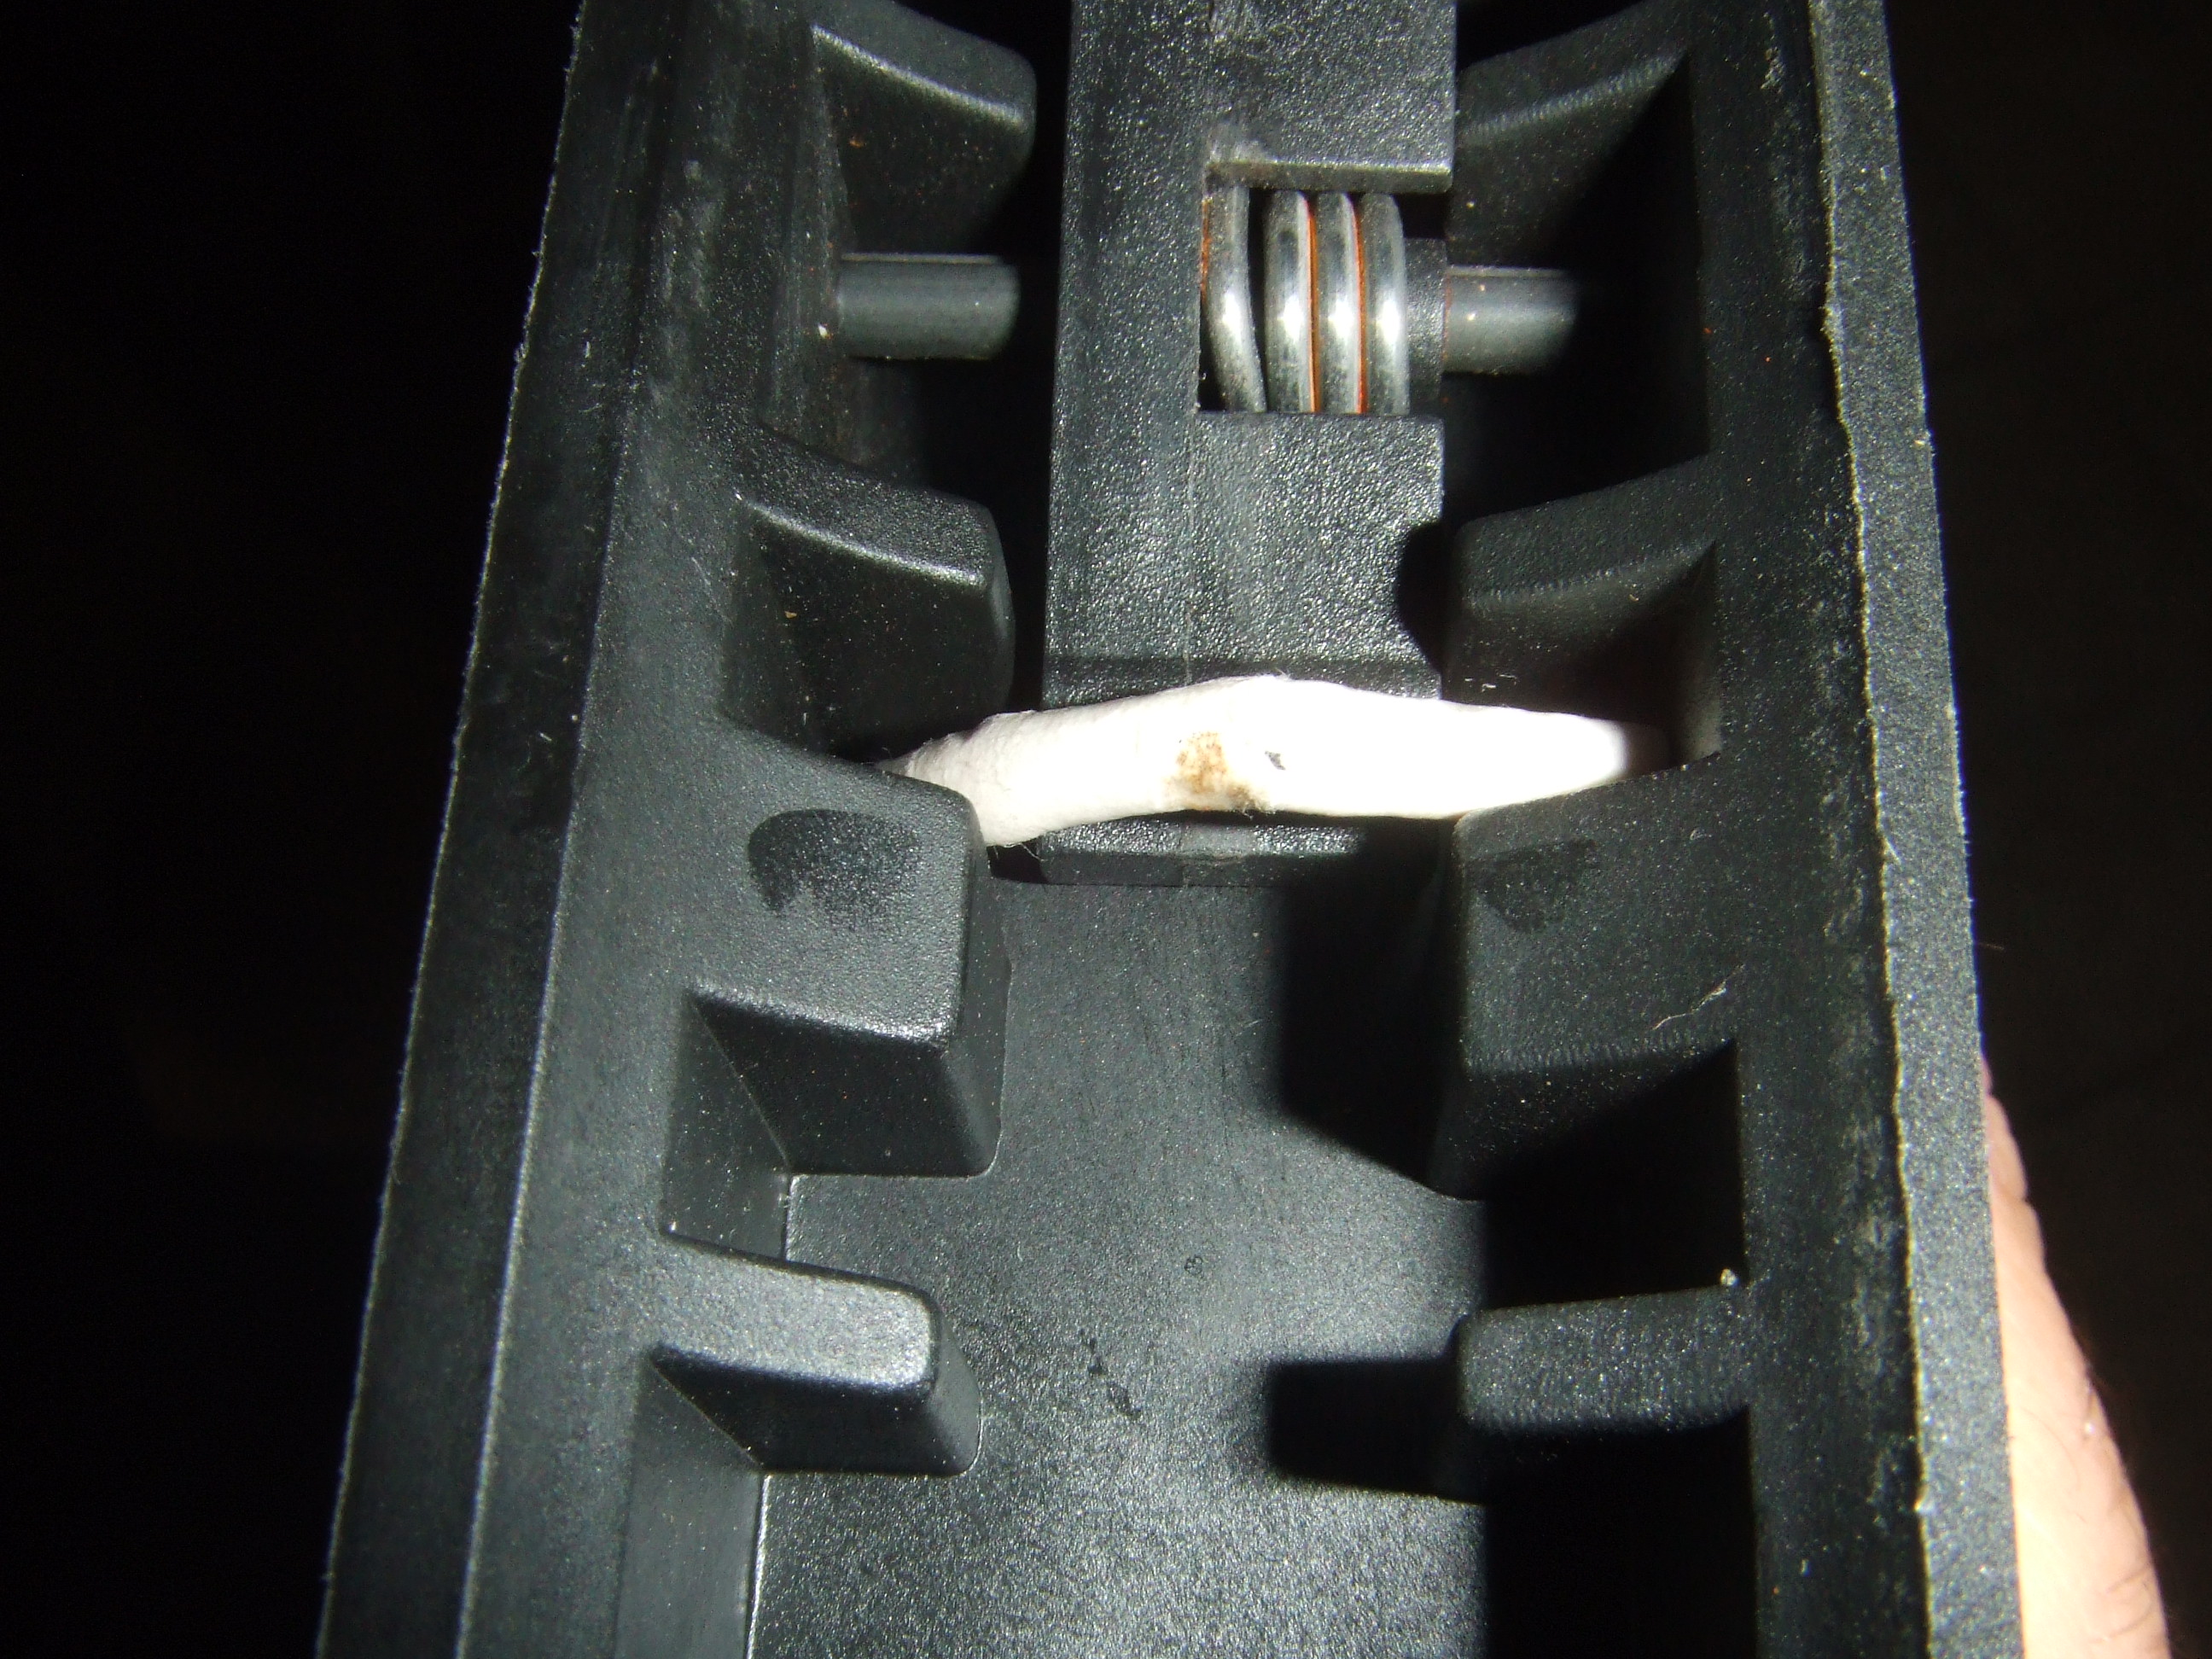
Trigger: The shark has a long trigger pull and the trigger assembly
is basically a one piece deign, incorporating
the trigger sear. The trigger pull is almost an inch in stock
configuration! The quick fix, is simply shim the assembly between the
rear of the assembly and the body. Experimenting with a paper lollie pop
stick, I was able to cut the trigger pull in half with no permanent
changes. As you see in the picture, most of the lollie pop had been
consumed already, you may use the flavor of your choice, but Dum Dum
lollie pop sticks seem to work just fine. Using this as a guide, the next step would be to
drill holes in the frame body for a more permanent roll pin type stop,
however that may also require slotting the gun body and some precise
work.
Barrel: The Shark came with a 10" aluminum non ported barrel. This
is one area where I wish there was some brass in the Brass Eagle. It is
not a bad barrel, and with some internal polishing it becomes much
better. About the only other barrel with the exact same threading was
the Brass eagle Raptor, unfortunately even the raptor barrel is not a
drop in upgrade. The raptor barrel will need to be cut down on the
breech end a small amount in order to fit. Its easy to cut a barrel
down, its much more difficult to cut a barrel down correctly and evenly.
A large pipe cutter can help in this mission should you decide to do so,
but don't forget to smooth out the rough edges, and it goes without
saying, proceed at your own risk. On the upside, you can actually find a
good barrel made for the raptor on occasion and some of the better known
manufactures produced them. Some say Spider barrels also fit, this
is only partially correct. Though the threading is similar, the
threading collars are of different lengths, and the threads are slightly
different. So even though a spyder barrel may appear to fit, it does not
and using one may distort the input threads on the gun or the barrel,
and the ball will not sit properly in the breech, hurting accuracy.
Pump Arm: Its all plastic, its not very smooth in stock form, but
its durable. The action will improve quite a bit after you polish the
internals, including the bolt and hammer to a mirror finish. It is
important both pump arm screws or suitable replacements are installed
for best performance. Neglecting the pump arm screw will result in a
very sloppy pump action as it will be very flexible.
The Feed Neck is very wide, even more so than the old standard of 1"
by a few 16th's of an inch. The makes fitting an elbow if you dont have
an original a bit of a chore. On the upside, the Inside diameter of the
feed neck will accomodate a ten round tube snugly making a
"cram and jam" style stick feed simply a matter of in serting a stock
class 10 round tube. Since the feed neck is just a plastic composite,
a bit of work with some sand paper and you can reduce the od to a more
acceptable size.
Rollers: With further research I have noticed allot of complaints about double feeds and
ball roll outs. While I didnt have any issues with this, I am also very experience using pumps
without detent systems and automatically adjust for these issues. I can easily see it becoming an issue
for less experienced players, or when you pump timing is off. though this is primarily user error in my opinion,
it can and will happen on occasion to even the most experienced players. I will investigate the potential of
adding a detente system of some sort to the tiger shark.
So lets review:
The Brass Eagle Tiger Shark is a no frills,
inexpensive direct feed pump action paintball gun that is durable, easy to
clean and has some limited, but very effective upgrade paths. It can be
found used fairly easily, often for under $30.00. Upgrades include Raptor
barrels (with some precision shortening), polishing the internals, recessing
the valve body screw for improved air flow, and uses standard nelson
springs. There are only two o rings to worry about, one on the bolt, and
another in the valve body, and they are easy to find. The plastic body pins
can be replaced with still available pull pin with rings, that were used on
many other BE products including the stingray and marauder/after burner
series of markers. There was a factory bottom line kit sold, but it is
harder to find.
Some disadvantages include low initial velocity, with no easy adjustment, spring changes or
shims (washers) must be used. However, the Shark will rarely shoot above
field limits unless it is modified as noted above. If you are not a back
bottle configuration fan, changing the air input source location will be
difficult, unless you can find one of the rare bottom line adaptors offered
by BE for stingrays and tiger sharks, or fabricate your own. A lack of
compatible barrels also go into the negative check mark zone, fortunately,
the stock barrel is usable, though very loud, and there's always the BE Raptor
barrel option.
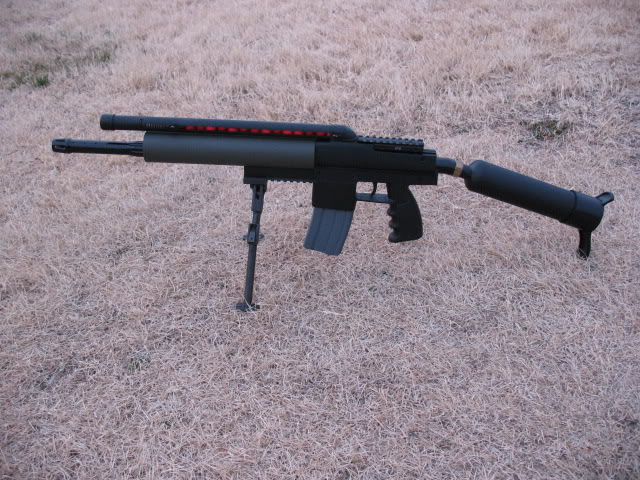
How does it play?
The first thing you'll note when you pick up a Tiger Shark, is that it
is beefy! It has a comfortable feel and is nicely weighted at about 1.8
pounds without tank. It feels solid, and not cheap like some other low end
pumps. Its also not so heavy as to be burdensome. The writer likes a nice
shoulder stock, so I'm comfortable with the true back bottle positioning.
After a good clean up and some very basic tuning as detailed above, I was
able to group six of six paintballs within six inches at about 40 feet after
installing a 20 oz tank. Not a long range, but about average for a short
field contact. Despite the fact the paintballs being used (severe) were over
six years old, all balls went on target in a nice tight group, with no
chops. The pump arm does have some flex to it, and it could use a pump
return spring to speed things up a bit, but for a sub $30 pump (used) it
performed above expectation and is on par with a PMI Trraccer or ACI
Maverick.
Update: Recently I used the Tiger Shark at a large scenario game for a few hours!
Please keep in mind that this marker is bone stock except for a bit of polishing and some new orings.
I chronod in at about 240 fps, with a 10 fps spectrum on the stock , original spring set. the low fps
certainly limited range, and I had to go in arc trajectory mode to get any sort of distance. It was still
a blast to use though, reminiscent of my splatmaster in fact, just easier to shoot and more reliable. It was
easy to manipulate, even with a 20oz co2 tank, fairly well balanced (though a bit tank heavy, a 7- 9 oz
co2 or 13-22ci hpa tank wouldve been far better choices)and i had about a 1 foot spread at 75 feet.
despite this, I was able to achieve a few key elliminations. In fact, it was one of the most reliable
markers i played with and I was able to easily compensate for any inconsistency. just a fun gun that
is only going to get better with a bit of work, and so cheap to buy!
Suggestions from the field:
Greenmtnphantom (scp forums): Is investigating the use of a new Empire Trracer Bolt, which is adjustable,
in the Tiger Shark. He will update us when he has tested this theory. I have tried a 1st edition
trracer bolt, and while it physically fits, the Shark power tube is to far to wide to fit within the
adjustment ring on that bolt. so old adjustable trracer bolt is a no go, waiting to hear on the new
trracer bolt.
Weigel21 (TechPB.com forums) sent his "A.R.B.A.T.S" project link to us. His creation is a
horizontal spring fed , bolt action redesign of the shark into a rather cool AR-15 simulacrum. You
can see the full details of this creation
here.And he has more hes working on!
If you have other modifications, suggestions or just comments, please hit
the email link below, try out our new comment box below, or visit our message board to add your thoughts. We
hope this article was helpful.


 pins. removing the rear lower pin allows the body to tip up and away from
the frame. This is a great feature for easy field stripping, especially if
you replace the factory push pins with Pull pins, as seen in fig. 2.
pins. removing the rear lower pin allows the body to tip up and away from
the frame. This is a great feature for easy field stripping, especially if
you replace the factory push pins with Pull pins, as seen in fig. 2.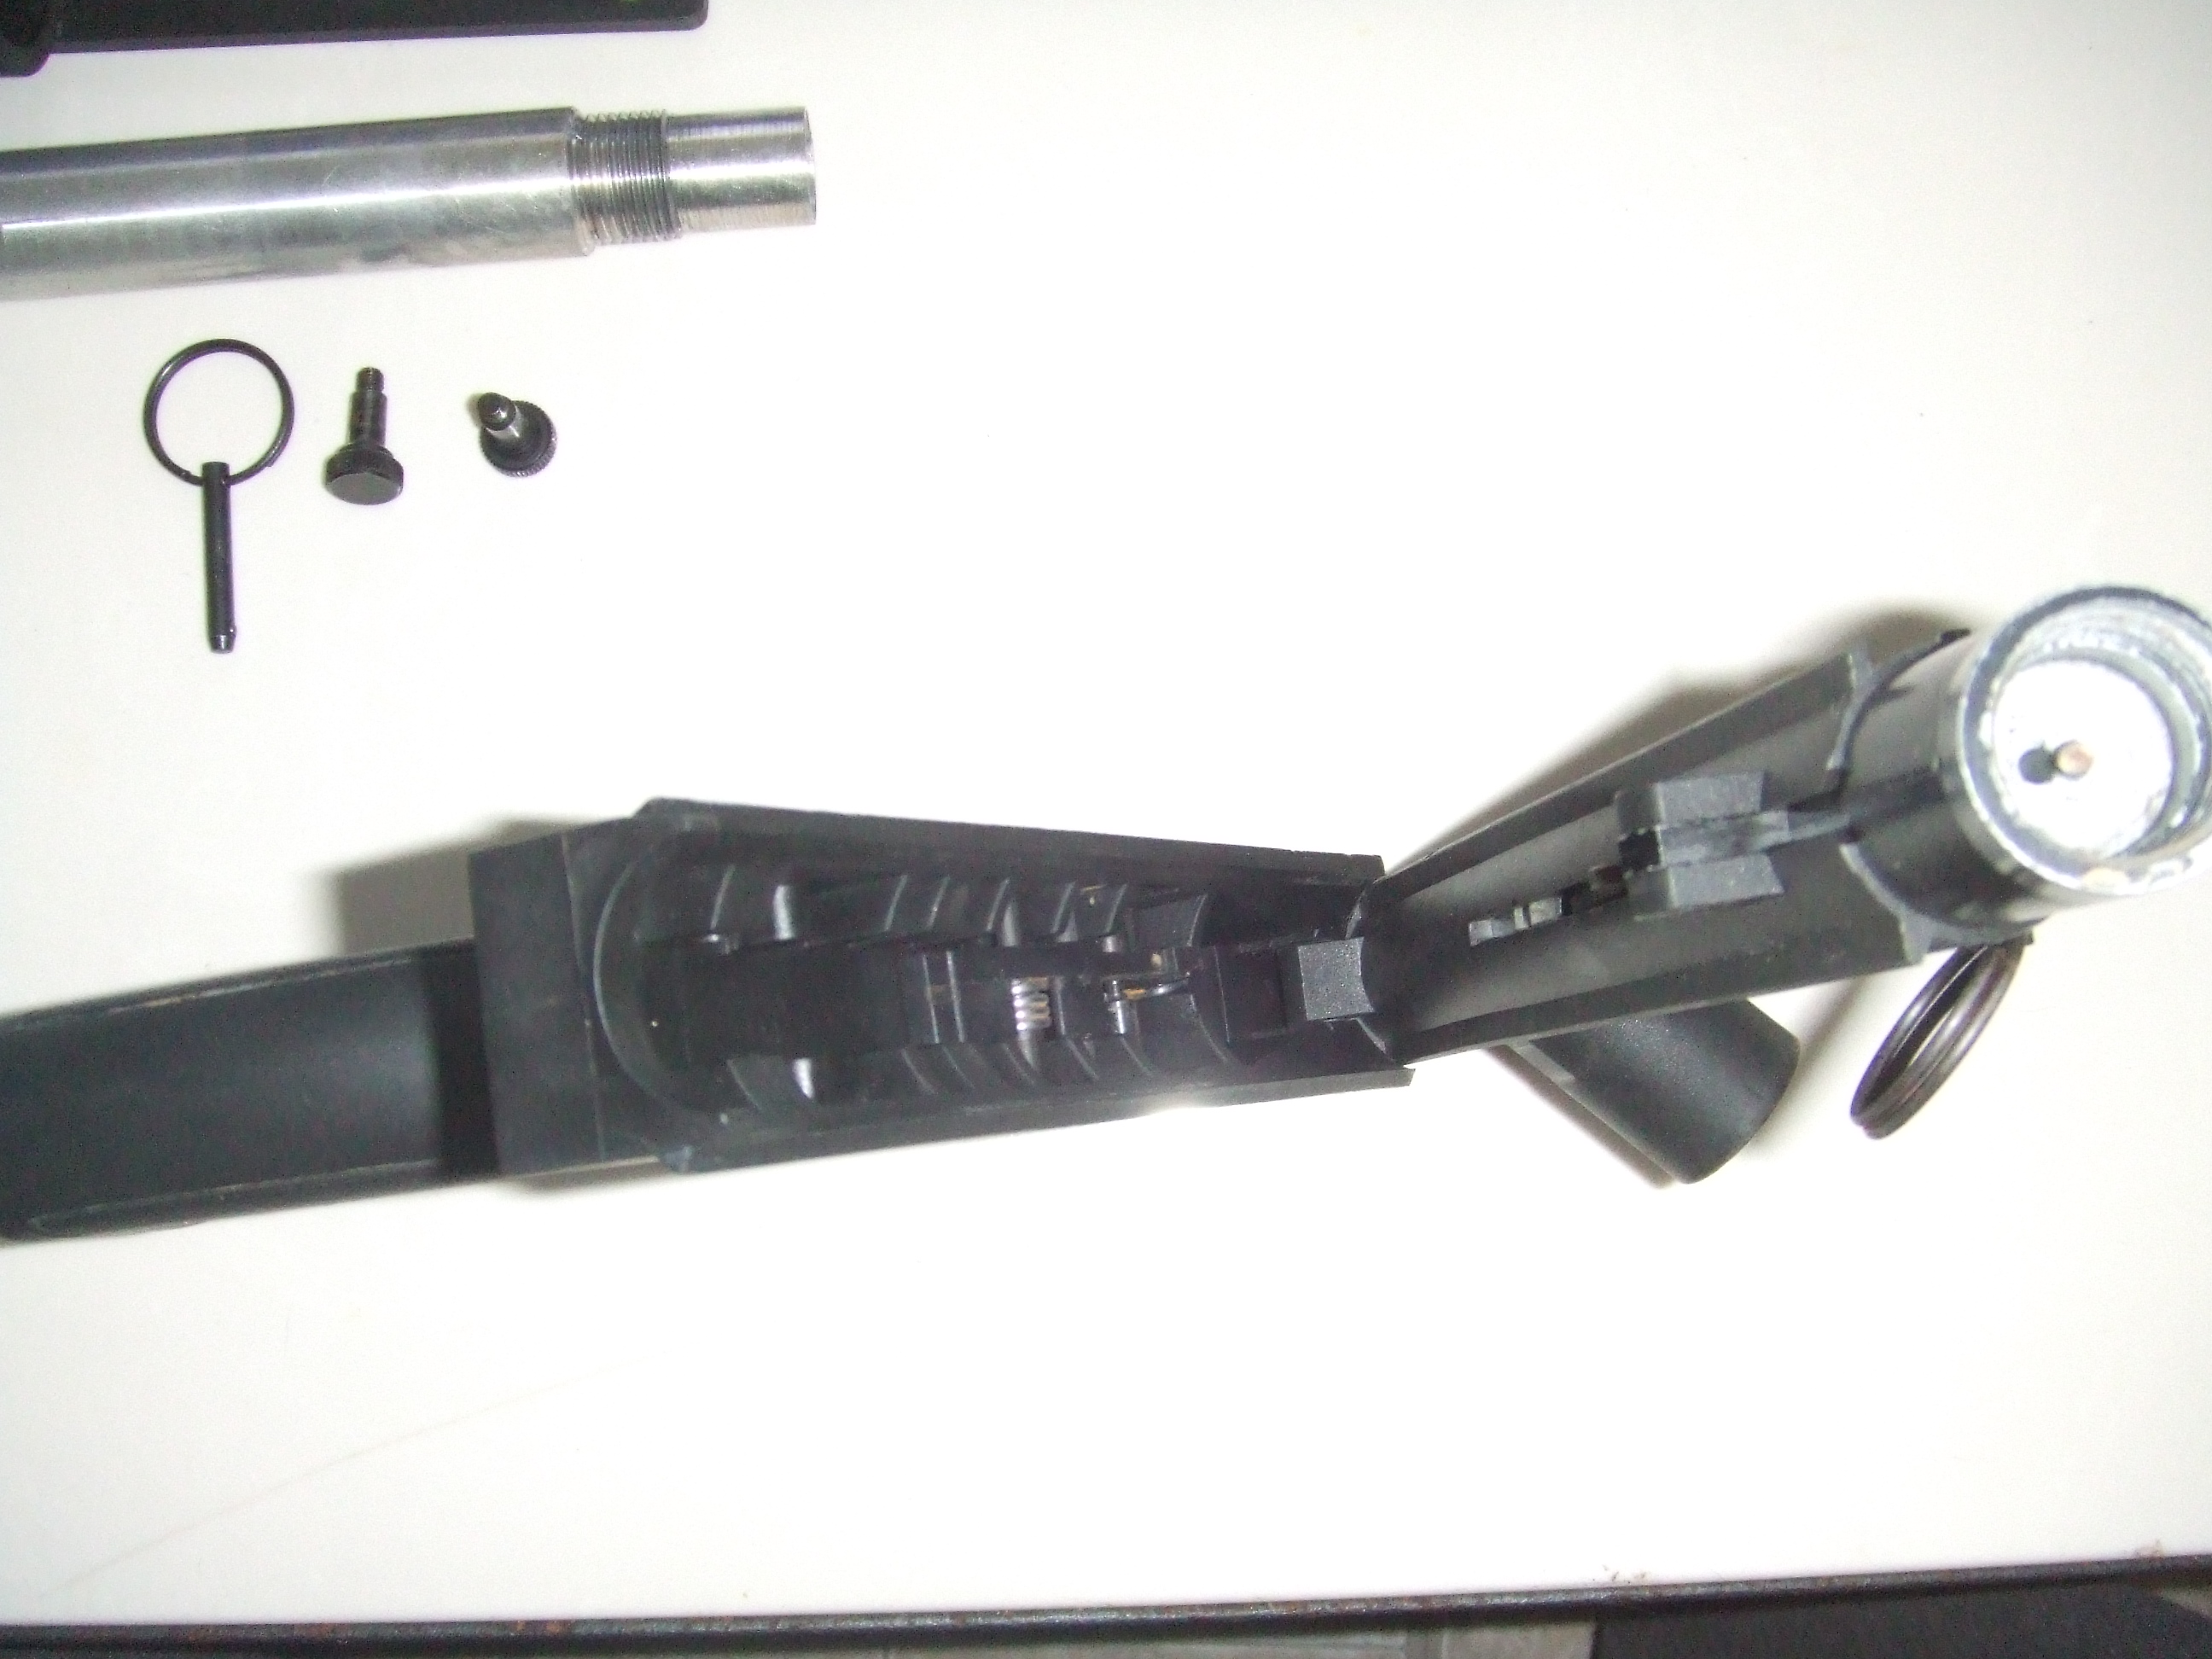 The
plastic factory pins simply push out from the narrow side, use a small punch
or even an Allen key, they don't require much force to remove.
The
plastic factory pins simply push out from the narrow side, use a small punch
or even an Allen key, they don't require much force to remove.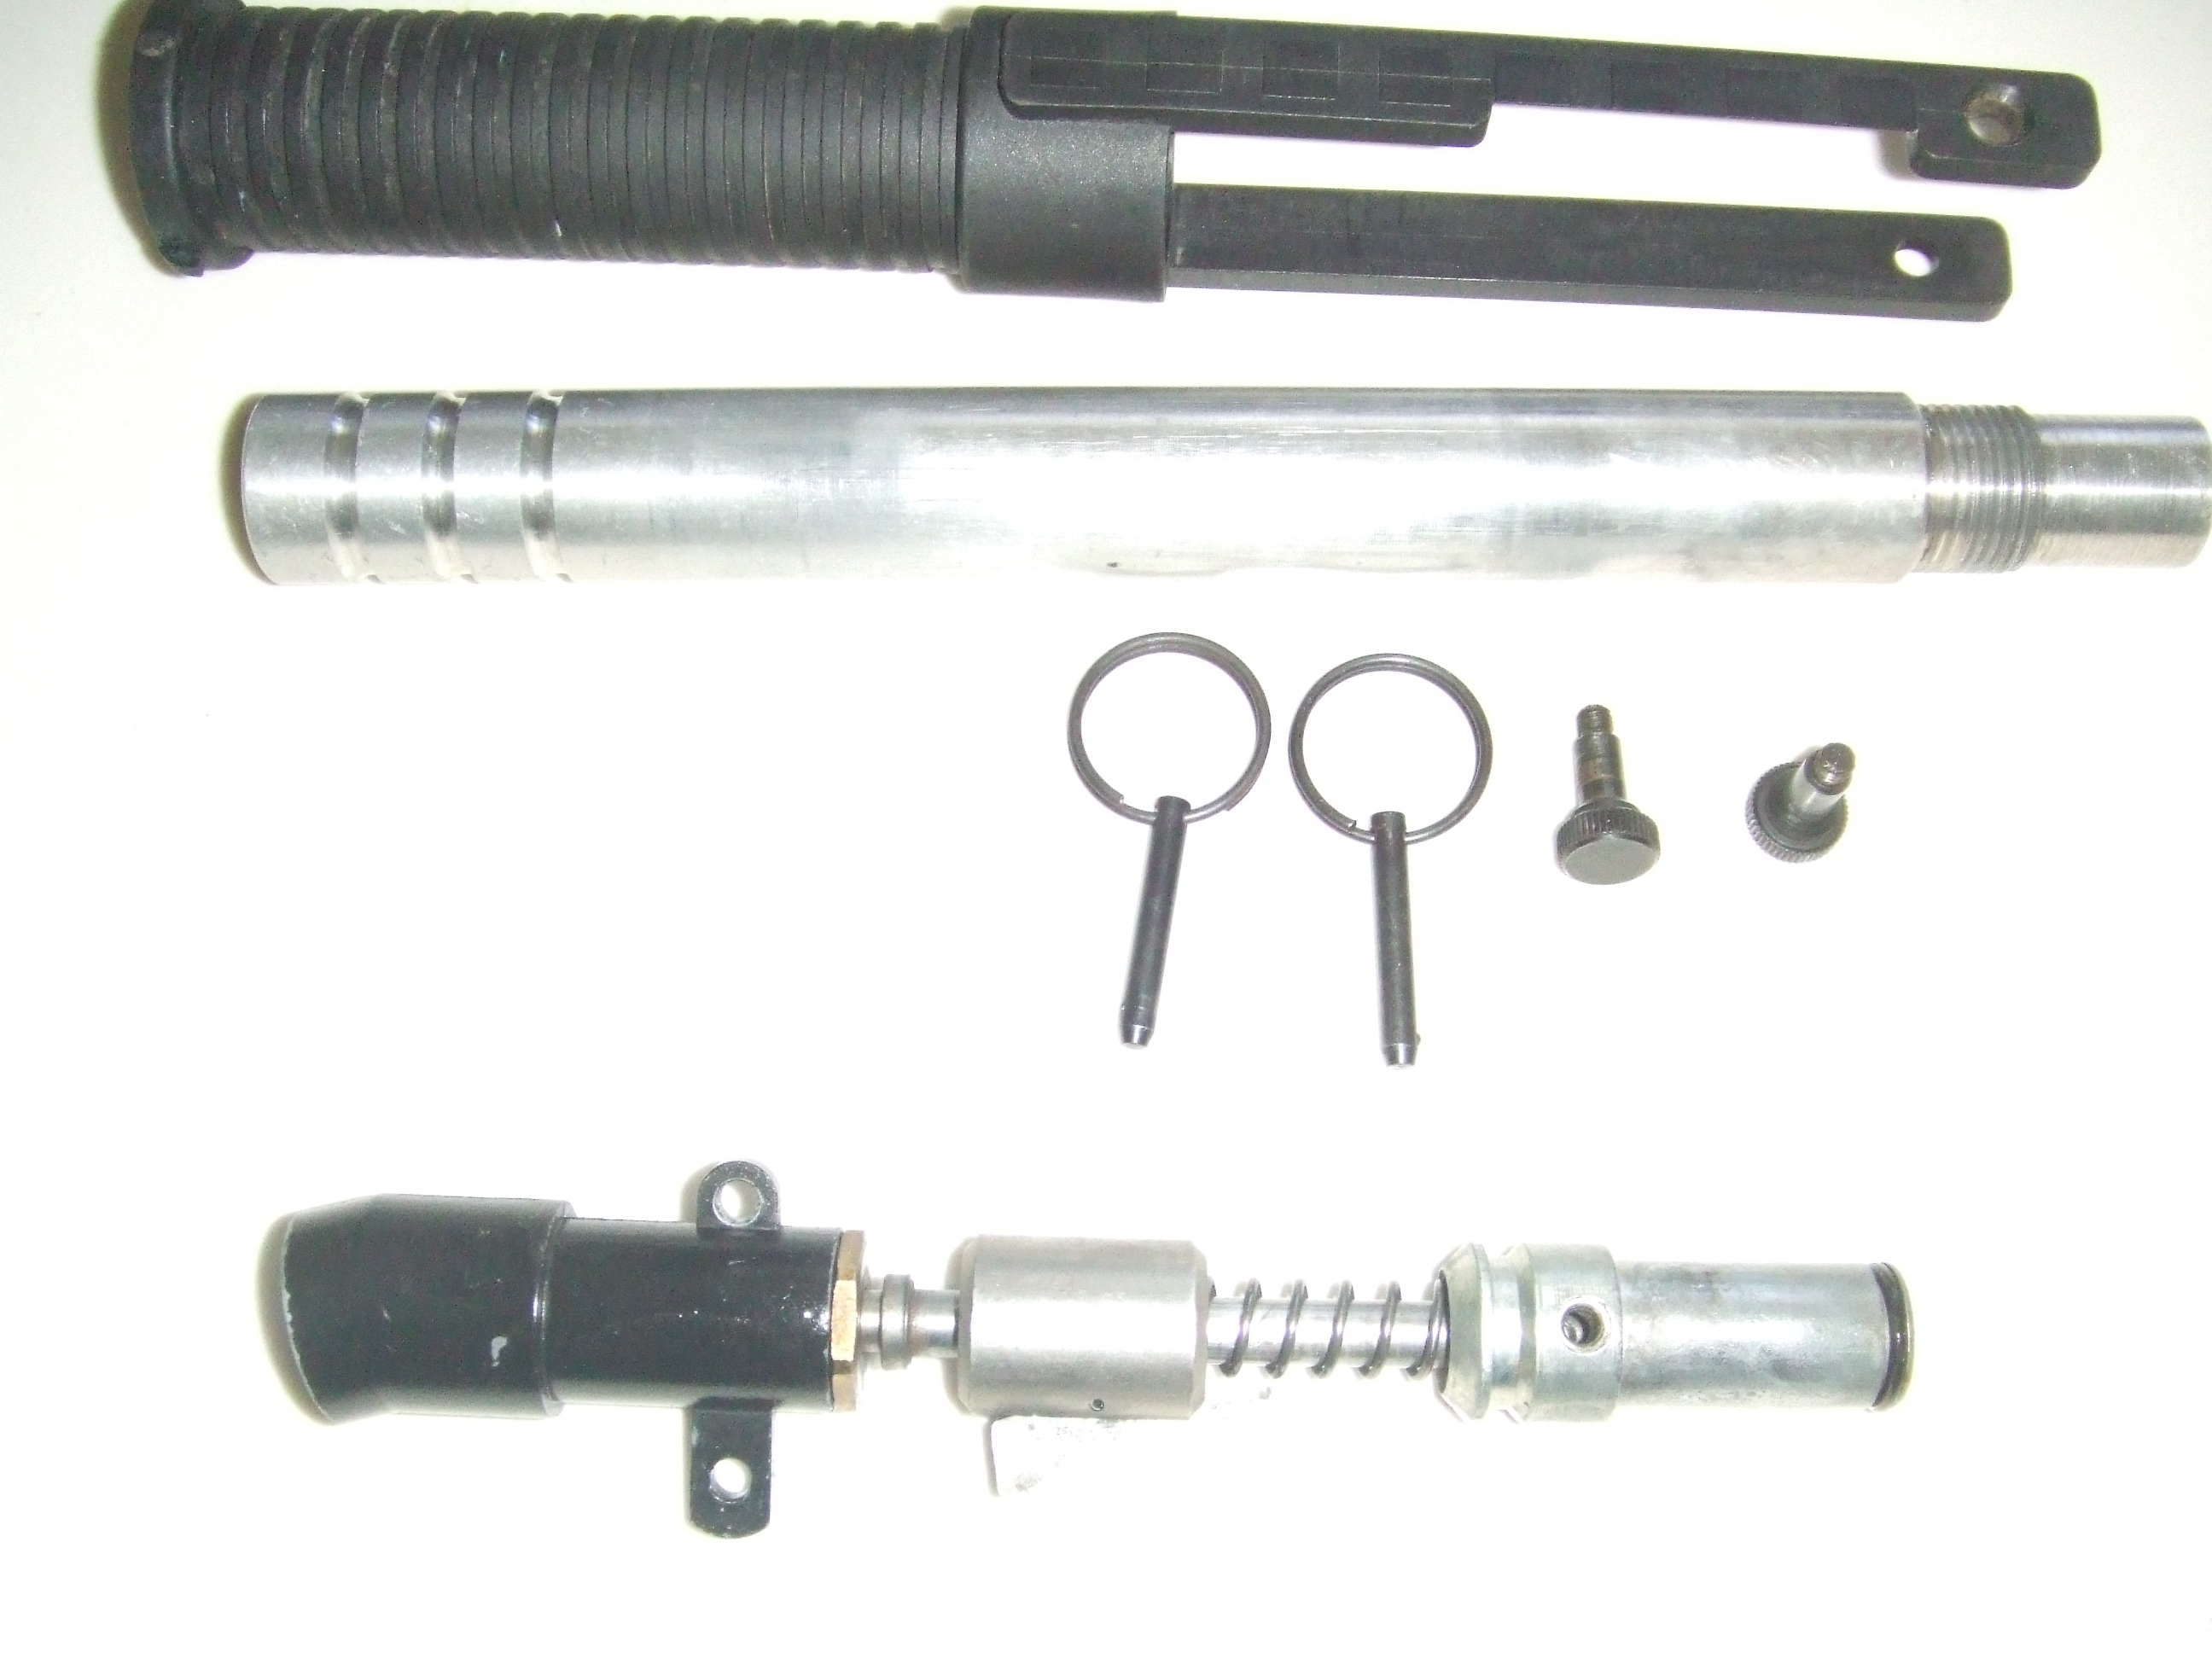 just in case. Figure three shows the full set of internals after they have
been removed. You will also need to unscrew the knurled bolts from the pumps
arms and remove the pump.
just in case. Figure three shows the full set of internals after they have
been removed. You will also need to unscrew the knurled bolts from the pumps
arms and remove the pump.  Adjusting
Velocity: You've got to go old school if you want to adjust velocity on a
Shark. No adjustable bolt, no adjustable hammer, so that leaves you with
shims and springs. Stock with new original springs Sharks should shoot in
the 215-260 range depending on air source, and temperature (if using co2.)
Which is okay, but not great, however it is enough to get a paintball to
break on target in moderate weather.
Adjusting
Velocity: You've got to go old school if you want to adjust velocity on a
Shark. No adjustable bolt, no adjustable hammer, so that leaves you with
shims and springs. Stock with new original springs Sharks should shoot in
the 215-260 range depending on air source, and temperature (if using co2.)
Which is okay, but not great, however it is enough to get a paintball to
break on target in moderate weather.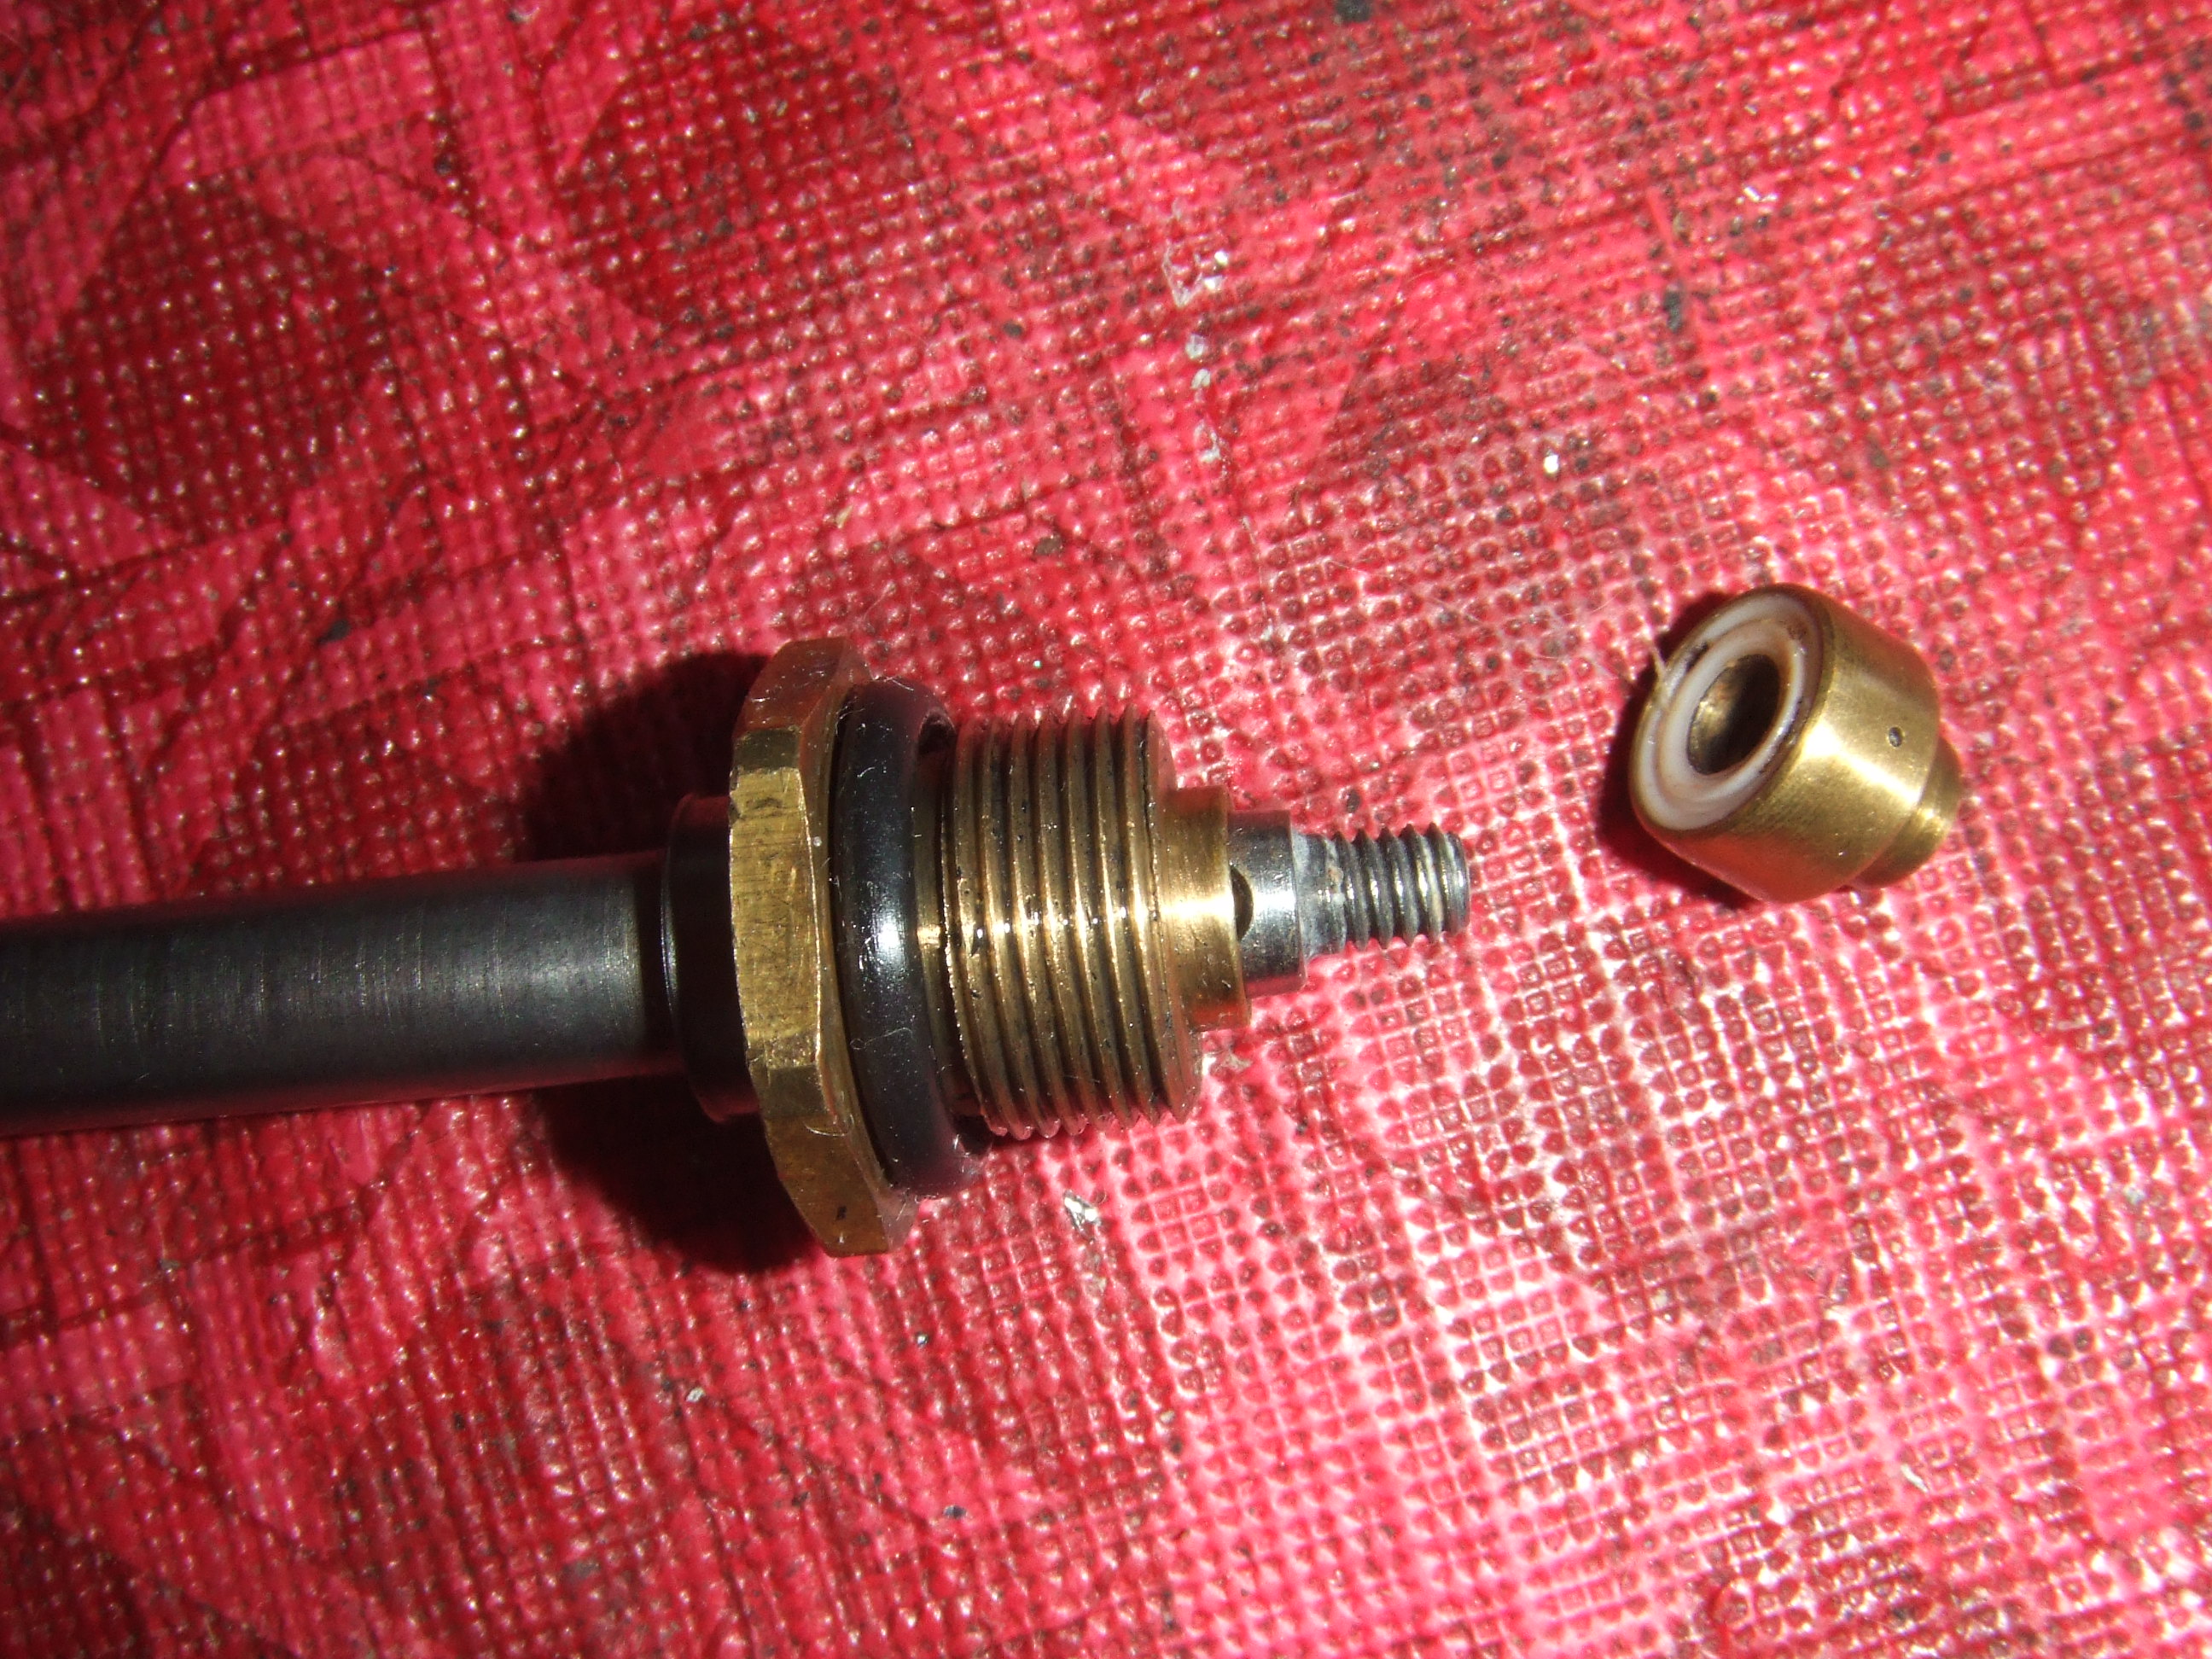 this, but it may also create other issues so take heed before getting
out your drill. He found a cure by simply drilling the tube nut a small
bit, which allows the shoulder on the valve tube to sit deeper into the
securing nut. This has the result of exposing more of the gas port
inside the valve, thus allowing more air or co2 though to the bolt.
A disadvantage of this is that you will also have to add a washer or spacer
to the back of the hammer as well to ensure it proper operation. Plan on
adjusting or changing springs after performing this modification, as it
may suddenly shoot "hot." I have not yet done this so I cant say from
experience if this alone
this, but it may also create other issues so take heed before getting
out your drill. He found a cure by simply drilling the tube nut a small
bit, which allows the shoulder on the valve tube to sit deeper into the
securing nut. This has the result of exposing more of the gas port
inside the valve, thus allowing more air or co2 though to the bolt.
A disadvantage of this is that you will also have to add a washer or spacer
to the back of the hammer as well to ensure it proper operation. Plan on
adjusting or changing springs after performing this modification, as it
may suddenly shoot "hot." I have not yet done this so I cant say from
experience if this alone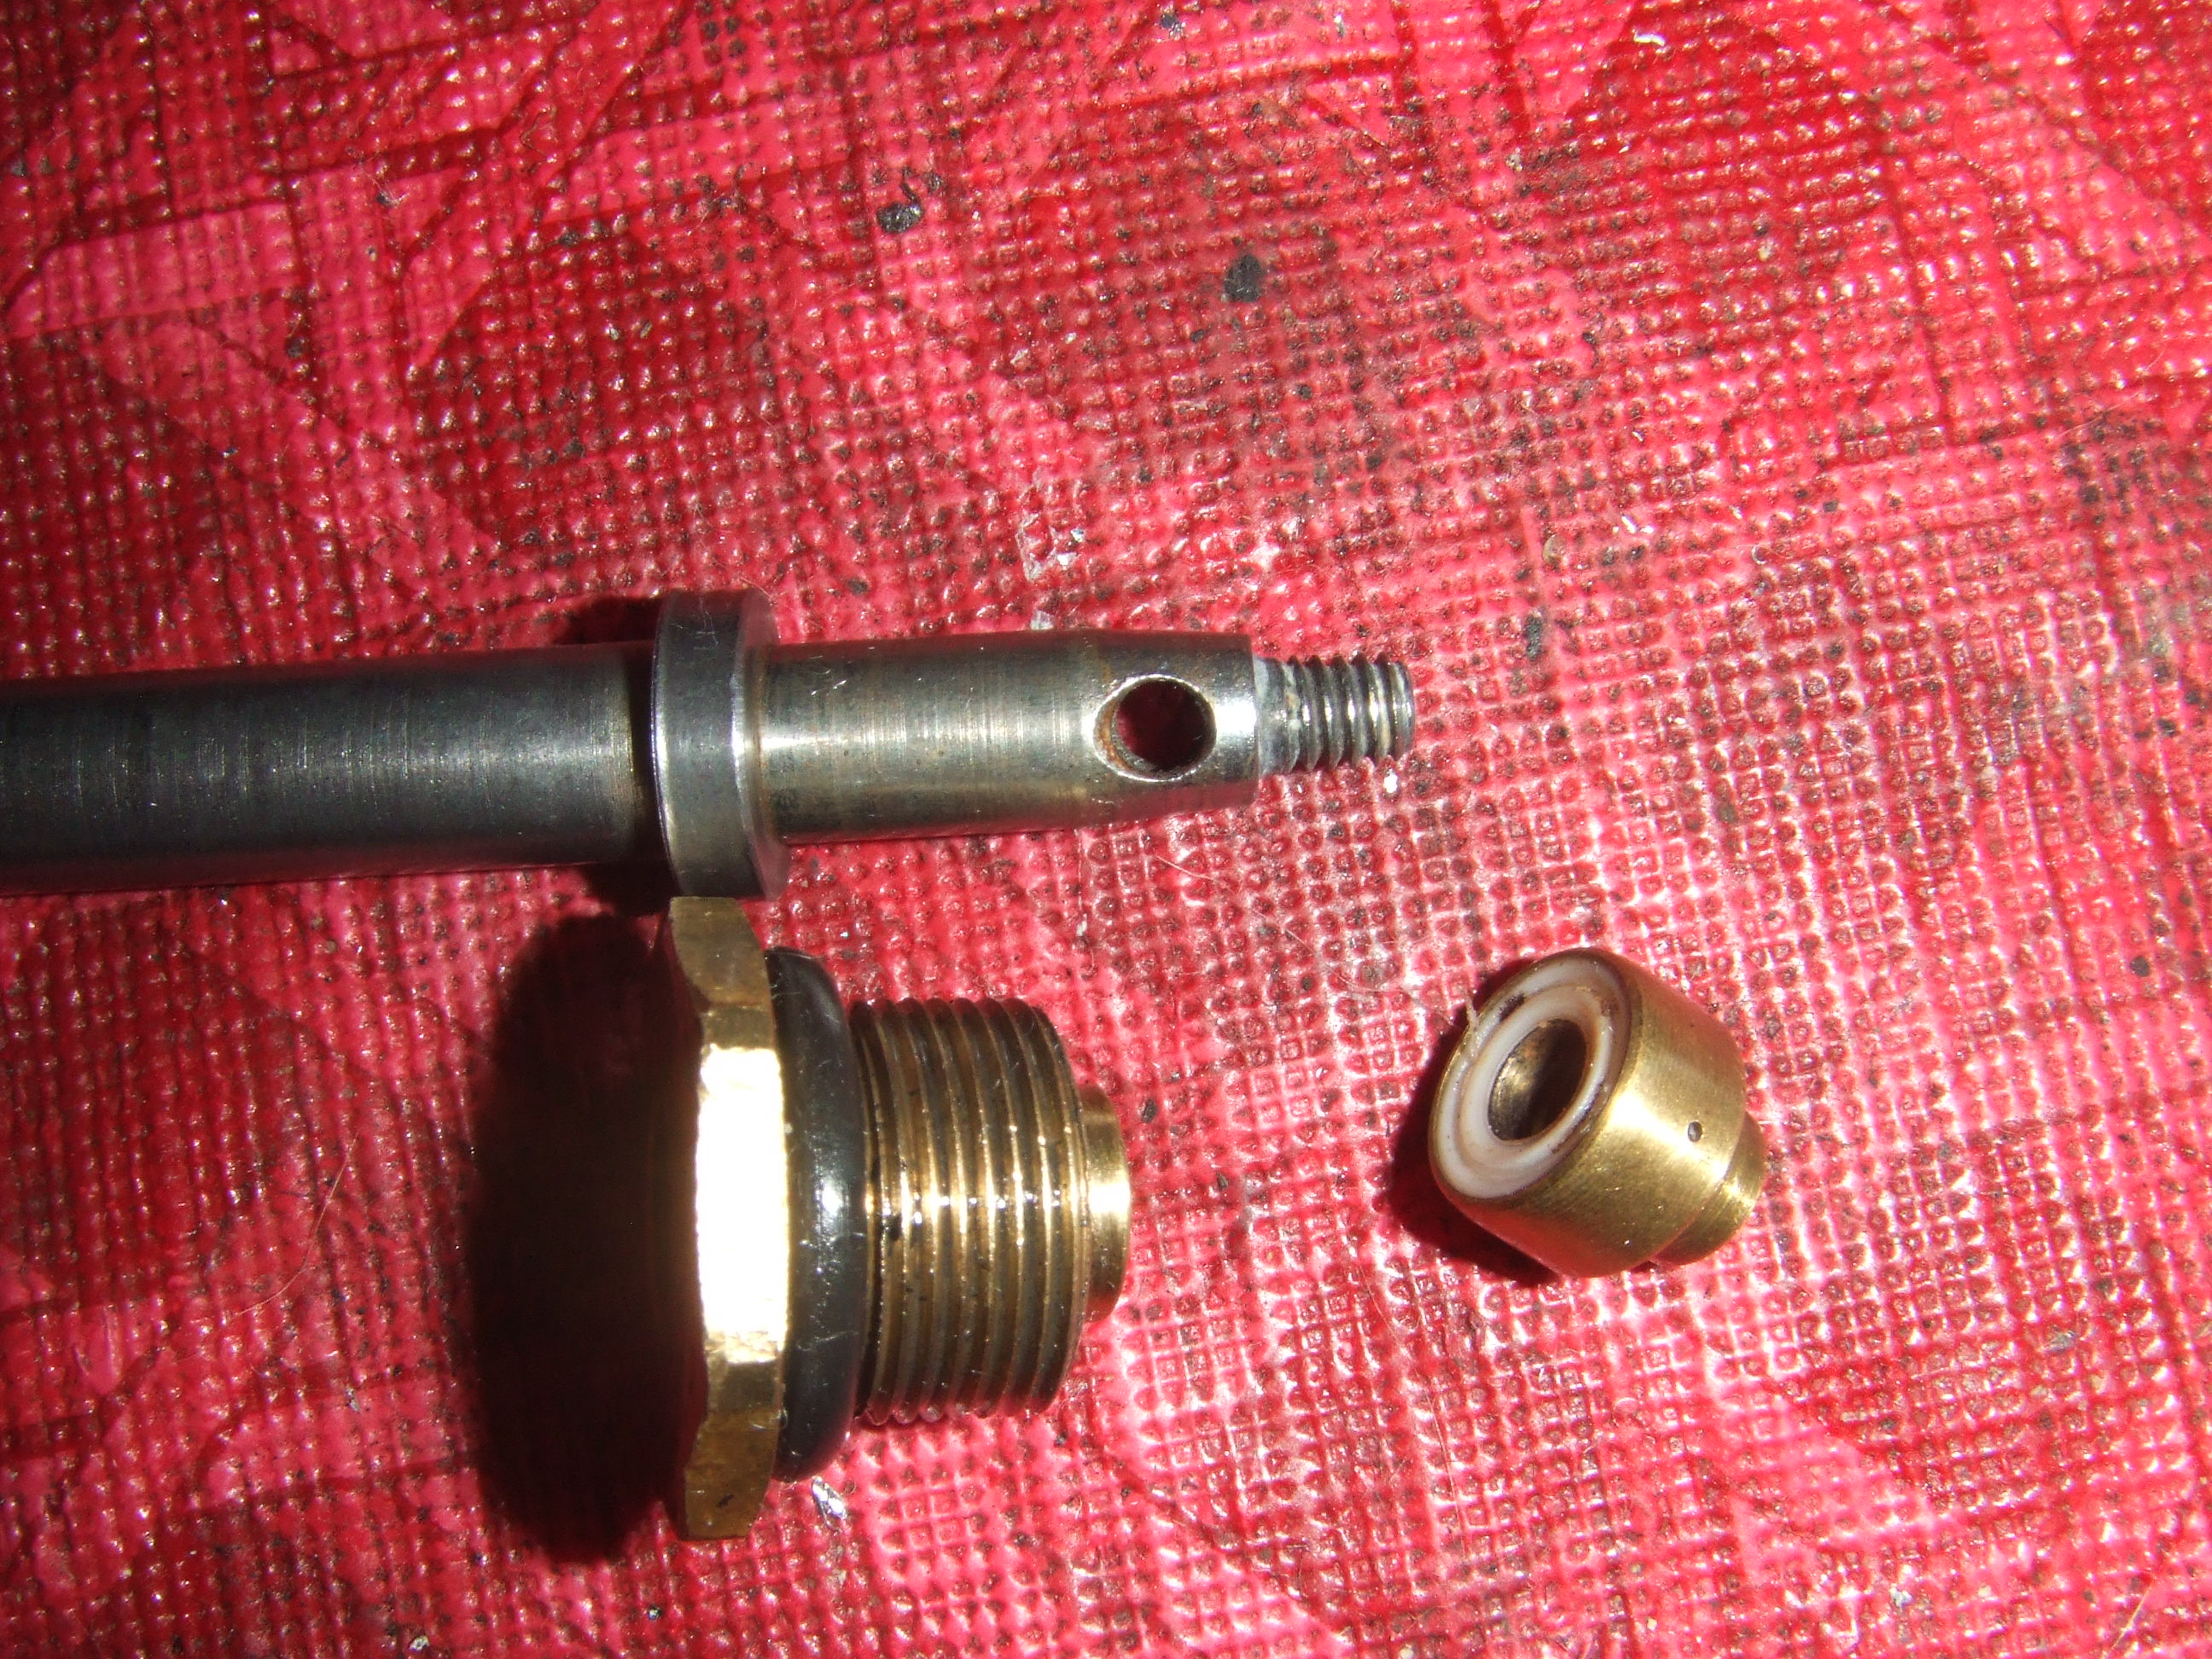 is enough to increase the stock set up velocity to over 280 FPS, but
it's certainly something to keep in mind.
is enough to increase the stock set up velocity to over 280 FPS, but
it's certainly something to keep in mind.